Bee Skep
Make a Bee Skep for Your Garden
|  |
Bees are not indigenous to North America and the native Americans, never having seen them, called them "English flies." The first record of bee importation is in 1638, but most kitchen gardens included several "skeps" -- basketry beehives -- to provide honey for the household by the end of the 17th century.
Honey had myriad uses in colonial America: hams were cured and fruits were preserved in honey; and rinsings from honeycombs were used to make mead (an ancient fermented honey drink). Beeswax was almost as important a product of the skep as honey -- it was used to waterproof leather, to smooth thread for sewing, to bind wounds, as a precious ingredient in candles, and even as a type of early chewing gum.
The relationship between beekeeping and the herb garden is centuries old. Many herbs have a special attraction for bees and, since the insects pollinate the plants, the two work in unison. Lemon balm (its name is derived from the Greek word for “bee”) has long been a neighbor of the bee skep. Early beekeepers rubbed the insides of their skeps with it to attract bees, or mixed balm with honey to line the insides of skeps. Bee balm thyme and borage also attract honeybees.
In 1838, the
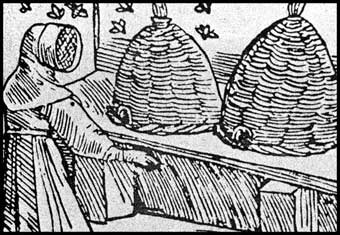
Farmer's Guide reported that "Of all the substances of which hives are made . . . straw has been the most generally preferred." Straw beehives had been used for centuries by the time of this statement, and it is the dome-topped straw skep that is usually associated with early-American beekeeping. They were made in a variety of sizes. In the middle 1800's, a skepmaker named Wildman was weaving hives "seven inches in height and ten in width. The sides are upright so that the top and bottom are of the same diameter. A hive holds nearly a peck!''' Wildman's small skeps were dwarfed by surviving skeps from Pennsylvania that are two feet tall and a foot across. Some were two-piece; the bottom skep was the larger, with a small hole in its dome, and a smaller skep sat atop it. The queen was kept from the top skep with an excluder -- a physical barrier - that blocked her entrance but allowed the smaller drones to pass through. The drones would not remain, but only deposit honey, so the honey could be removed without killing the bees.
Bees entered and left the skeps by one of several means. Some had holes cut into the straw near the bottom as large as a single coil was thick. Others had no holes; they had to be lifted off the ground slightly and placed on boards to provide access for the bees through the open bottom. Still others had oak splints (thick pieces of oak, split out of a sapling or a branch) sewn to the base through drilled holes. Skeps sometimes had straw handles on top.

Beekeeping in colonial America was a simple procedure. A single skep was maintained throughout the winter. It was usually insulated and always kept under cover, and the bees were fed to sustain themselves throughout the cold months. In the early summer the beekeeper caught and skepped the swarms that issued from his winter hive. Natural reproduction would populate his other hives, and the inhabitants would produce honey in them all summer long. Then, in late summer, the owner killed the bees in most of his skeps by burning sulphur beneath them. He would then cut out the beeswax and harvest the honey.
Straw skeps had several disadvantages that caused them to be replaced by wooden hive boxes. First, the bees had to be killed to harvest the honey (The two-tiered straw hive alleviated this problem to some extent). If a beekeeper's winter hive died, he would have to find another swarm to start all over again the following summer. Second, the bees attached their comb to the walls of the skep. In some cases two oak rods were pushed through the skep walls so that they crossed inside about halfway up to provide a place for the bees to anchor the comb, but it still ended up stuck to the skep wall.
That is not to say, however, that a modern gardener may not use one of several reproduction skeps to add an authentic touch to a herb garden. Skeps are easy to create with materials gathered from the roadside, or purchased from a local farmer.
An authority on creating skeps, Rolla Chandler once talked about skep-making at a crafts festival in Waterford, Virginia. "I have used all sorts of grasses," he said, ”but I like rye straw best because the stalks are very long. You have to get the rye before the farmer threshes it; after it is threshed the grass is broken into short pieces and is worthless."
If you can find a local farmer who grows wheat, oats, rye, or barley, make arrangements to buy some of it before threshing begins. Otherwise, look for patches of tall grass in the wild. There is no rule of thumb as to how much grass is needed for one skep - that depends on the size of the skep and the diameter of the coils - but a bushel basket of grass should be enough to make a medium-sized skep. Small coils use less grass, but a skep of tiny coils takes longer to weave. A weaving material, called a binder, is also necessary to hold the coils together. Mr. Chandler uses everyday twine; split reed like that used for chair caning works just as well.
The only tools you need are a spray bottle full of water, scissors, a bucket of water if split reed is the binder choice, and a needle. Mr. Chandler’s needle was the blade from a letter opener, dull, with a hole in the nether end through which to thread the binder. If split reed is used for sewing, all you may need is an awl to open the space for the stiff reed to be poked through the coils, and no needle will be required. A funnel-like device is the final tool, through which the straw is pushed to shape the coils. A short section of horn is perfect, as is a hollow bone or anything else of that shape. It must be sturdy, for it will take a good deal of abuse. The small end determines the diameter of the coil. A one-inch coil is a good size, but there is no hard and fast rule.
STEP ONE: Dampen the straw with the spray bottle before starting and keep the pile of straw covered to prevent it from drying out. Gather a handful and clip off the seed heads. Then tamp it down so that the starting end is even. Insert this into the wide end of the horn. Add straw until the horn's small end is filled tight. Push this beginning coil into the horn until about three inches protrude. Now reach for the needle, already threaded with the binder. Reed binder should be soaked in warm water before it is used, but twine is ready right from the spool. Anchor the end of the binder in the coil arid wrap it several times around the three-inch length.
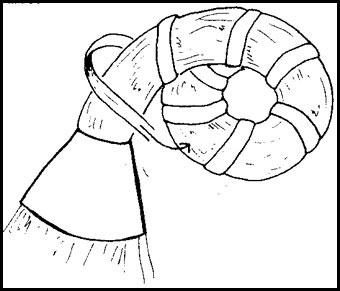
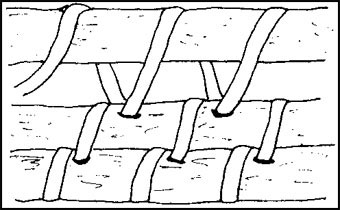
STEP TWO: Begin your skep at the top and work toward the bottom. Curve the three-inch coil around on itself as tightly as possible, keeping the binder tight so that the coil doesn't fall apart. When the coil overlaps, sewn it to the strand beneath it. Accomplish this by poking the needle through the top quarter of that strand, then looping the binder around the top coil and poking the needle again through the lower one. This single stitch is repeated again and again.
If you want your skep to have a handle, a loop of straw should be sewn on at this point.
STEP THREE: Skeps are generally dome-topped, so this must be taken into consideration from the very beginning. As the circle widens, make sure it takes on the: shape of a shallow bowl. When this bowl has reached the diameter planned for the finished skep, start coiling the sides straight down.
STEP FOUR: Eventually, the end of this first handful of straw will come, and as it does, simply trim the heads off more straw and poke it into the horn. Continue weaving around the circle, keeping the length of the stitches uniform. When the binder runs out, tie on a new one and, if you are using a needle, thread it through the hole and start looping and stitching as before.
STEP FIVE: Continue coiling and stitching until the finished height has been attained. Spray the straw pile as you go to keep it moist. Some skeps, Mr. Chandler's included, had entry and exit holes near the bottom. When the location for these holes is reached, cut off the coil and secure it by tying the binder tightly around the end. Then, as you did in the beginning, start with a fresh straw end, leaving the appropriate space for the bees to use. At the very end stop adding straw and let the final coil thin slowly, eventually~killing it into the bottom coil. Tie off the last binder end and the skep is finished.
Source: Adapted from an article by Ron Pilling
Found at www.colonialsense.com